CF Commuter Owner’s Manual
Thank you for purchasing a Pedal Easy E-Bike. Your bike has been carefully designed and assembled to provide the ultimate cycling experience by combining the very best elements of a quality bicycle with the added benefit of power assist when you need or want to use it. Best of all, it’s easy to use and maintain.
Specifications:
Frame: XC-lever, high modulus Carbon T800-18K
Size: 15” and 17”
Weight: 37 pounds
Wheel: 700c
Fork: TW MgAl alloy, Air suspension, Remote
Brakes: SHIMANO MT200 hydraulic Disc brake + PRO floating
Gears: SHIMANO SLX/M7000 Derailleur 21 speed
Tires: Continental, RACE KING, 29×2.0
Preliminary Safety Checklist: If your bike was shipped to you (as opposed to picked up at our shop) then, prior to use, please do the following (or have your bike mechanic confirm the following):
- Brakes
Check brake levers are securely fastened to handlebar
Check that both front & rear brakes effectively stop the bike
- Wheels & tires
Check tire pressure is within acceptable range (see “Maintenance” below)
Ensure front and rear axle nuts are tightened to specifications.
- Saddle
Adjust to proper height for rider & ensure clamp is secure
Ensure minimum insertion mark on seat post is not visible.
- Chain
Check chain is lubricated, clean, runs free, and is properly tensioned.
- Frame
The CF Commuter gets its incredibly light weight from a carbon fiber frame, which requires a bit of extra care in handling and examining. Look closely for scratches, especially anything deep or through the paint. With a large coin tap on any suspect area and listen for a change in sound. A normal “tap” sound will become a dull thud if the carbon is broken. Gently push on the suspect area to feel if it’s softer than the surrounding area. Also, after being in service on loose gravel roads, check underneath the down tube for impact cracks, which can be caused by rocks flying up and smacking the down tube. If you find anything that concerns you, contact PedalEasy for advice.
- Derailleurs
Check both front & rear for proper changing
Check that shifters are firmly attached to handlebar
- Electrical
Check for proper functioning of handlebar on/off switch and throttle.
- Safety:
Check that reflectors are visible, bell is functional, and rider helmet is worn. In Ontario, riders of power-assisted bikes must be over 16 years old and wear a helmet.
Warranty
There is a two-year replacement warranty on all bicycle parts, including electrical, should any parts fail due to manufacturing defects.
Disclaimer
Pedal Easy is not liable for any injury that may occur while using the Pedal Easy Bicycle. Please read the manual before using our product, and always wear a helmet.
Power control
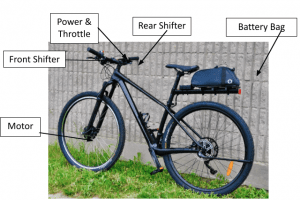
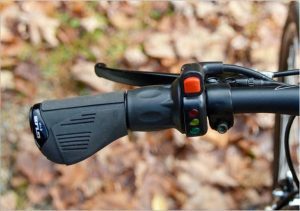 A half-grip twist throttle on the left side of the handlebar controls power to the motor. Rotating the throttle provides fine control proportional to the amount of power assist. For safety, the throttle spring returns to zero assist (no power) when released. The half-grip allows the rider to comfortably maintain throttle position while riding (index finger and thumb grip the throttle, while the other fingers hold the stationary part of the handlebar half-grip). We also have thumb throttle and finger throttle options. For comfort and upper-body cushioning, the palms should rest on the rubber lip at the rear of the ergonomic grips.
To activate the motor, push the red Power button. There are 3 LED lights (red, yellow, green) that give an indication of how much charge (energy) is in the battery. When all 3 LEDs are on, the battery is fully charged. At around 50% charge the bottom light (green) goes out; and when charge reduces to about 15% the middle light (yellow) goes out. The top light (red) stays on all the time the switch is “on”. The power switch should be turned “off’ whenever the bicycle is to be left unattended. Leaving it on not only drains the battery but also it is a safety hazard as someone may inadvertently twist the throttle, in which case the bicycle will move forward.
Power Assisted Cycling
The motor drives the front wheel of the bicycle, and the pedals drive the rear wheel. The front wheel drive helps with stability when cycling on sand or other soft ground, effectively “pulling” the front wheel in the direction of travel and preventing it from “ploughing”. The two drive systems (battery-power at the front and rider-power at the rear) are independent, so either can be used alone or both can be used simultaneously…that is, you can power the bike by pedaling only, just like a conventional bike, or you can power the bike by motor only (using the throttle) without pedaling, or you can pedal & use the throttle for assistance at the same time. When approaching a hill, particularly a steep one, engage the power before you get to the hill, and keep the speed up. If you slow too much when you’re on the hill, motor efficiency drops, which can cause it to feel below normal power.
CAUTION: On ice be careful with use of the throttle, particularly when cornering, as it can spin the wheel and possibly initiate a front wheel skid.
Battery
The battery is the heart of the e-bike. We use only Panasonic or Samsung Lithium-Ion cells, the gold standard. Feel free to charge after every use. There is no “memory effect” as there is with some other battery types, so charging at partial depletion has no negative effect on the battery. Charging when the battery temperature is below 0 °C can damage it. Using the battery at low temperatures, however, is not a problem. When used at low temperature though, the range is reduced (at minus 20°C the distance you can go on a charge is about half what it normally is). Avoid storing the battery at elevated (>25°C) temperature. Sub-zero storage temperatures are fine. Do not drop the battery on a hard surface. Retake photo with current battery in trunk bag
Battery Charging
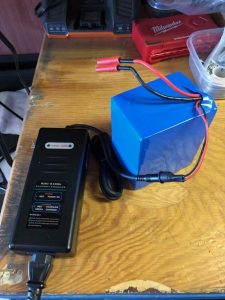 The small black plug on the battery plugs into the charger. The charger is plugged into a standard 110V AC household electrical outlet (or car inverter). The charger will also work on 220V AC power with a suitable outlet adapter. The charger has single power-on light that changes from red to green when the battery is fully charged. The battery can be left on the bike while charging, in a garage for example, or it can be removed for charging elsewhere, by unplugging the red socket and pin connector as described below. Retake photo with current battery charger.
The battery cannot be overcharged. It’s safe to leave it on the charger overnight.
Battery Removal for Charging
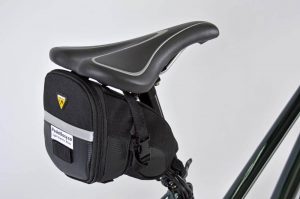
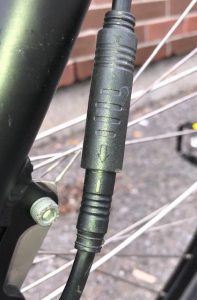
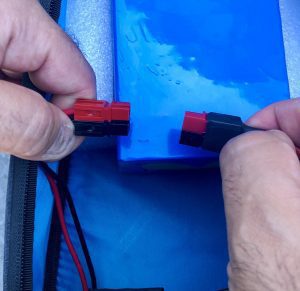 There are two connectors on the battery. The small black one connects to the battery charger. The other one with the red connector sleeves connects to the bike. They will only fit together one way, connecting red wire to red and black wire to black. To remove the battery from the bike for charging, unzip the pouch and gently pull the red connector sleeves apart. Pull only on the sleeves and never directly on the wires. Once charged, return the battery to the pouch and reconnect. Push firmly to fully insert the sleeves of the connector (this may take a fair amount of force). (re-take photo with trunk bag & more detail on what a fully inserted connector looks like).


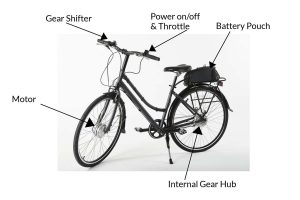
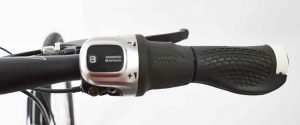 Internal-gear hubs, unlike derailleurs, can be shifted multiple gears at a time while stationary or lightly pedaling or while coasting. T
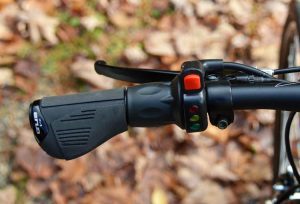 To activate the motor, push the red Power button.
 The battery is the heart of the e-bike. We use only Panasonic or Samsung Lithium-Ion cells, the gold standard. Feel free to charge after every use. There is no “memory effect” as there is with some other battery types, so charging at partial depletion has no negative effect on the battery. Charging when the battery temperature is below 0 °C can damage it. Using the battery at low temperatures, however, is not a problem. When used at low temperature though, the range is reduced (at minus 20°C the distance you can go on a charge is about half what it normally is). Avoid storing the battery at elevated (>25°C) temperature
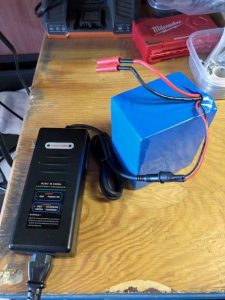 The small black plug on the battery plugs into the charger. The charger is plugged into a standard 110V AC household electrical outlet (or car inverter). The charger will also work on 220V AC power.
 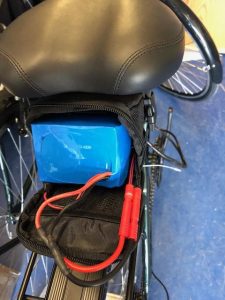 There are two connectors on the battery. The small black one connects to the battery charger. The other one with the red & black sleeves, connects to the bike. They will only fit together one way, connecting red wire to red and black wire to black. To remove the battery from the bike for charging, open the trunk bag and gently pull the connector sleeves apart. Pull only on the sleeves and never directly on the wires. Once charged, return the battery to the bag, and reconnect. Push firmly to
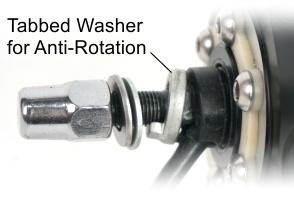
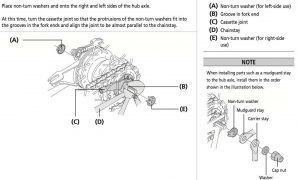
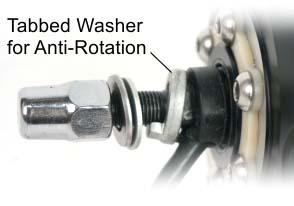 Installation is the reverse of removal: Insert wheel into dropouts, being sure anti-rotation washers are correctly positioned. Check to ensure the axle is fully inserted into dropouts & wheel is centered in the fork. The conventional washers go on the outside of the fork. Torque axle nuts to 35 N.m …proper torque is important to ensure solid retention between axle & fork and prevent rotation of axle due to motor torque.
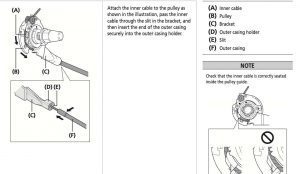


 A half-grip twist throttle on the left side of the handlebar controls power to the motor. Rotating the throttle provides fine control proportional to the amount of power assist. For safety, the throttle spring returns to zero assist (no power) when released. The half-grip allows the rider to comfortably maintain throttle position while riding (index finger and thumb grip the throttle, while the other fingers hold the stationary part of the handlebar half-grip). We also have thumb throttle and finger throttle options. For comfort and upper-body cushioning, the palms should rest on the rubber lip at the rear of the ergonomic grips.
 The small black plug on the battery plugs into the charger. The charger is plugged into a standard 110V AC household electrical outlet (or car inverter). The charger will also work on 220V AC power with a suitable outlet adapter.
  There are two connectors on the battery. The small black one connects to the battery charger. The other one with the red connector sleeves connects to the bike. They will only fit together one way, connecting red wire to red and black wire to black. To remove the battery from the bike for charging, unzip the pouch and gently pull the red connector sleeves apart. Pull only on the sleeves and never directly on the wires. Once charged, return the battery to the pouch and reconnect. Push firmly to